# Acolyte (lv1-70)
Written by Mumei #4529 from ROO Discord Tavern
\
**Introduction**
Acolytes are devout followers of the light. Healing and support are their fortes. They are essential to every group. This is the only job that can wield holy elements. They are from the Acolyte Guild in Prontera, the capital city of Midgard.
\
In this guide, we will find:
* Viable Builds
* Skill Points Distribution
* Stats Distribution
* Recommended Equipment
* Job Progression
* Leveling Spots
* Job Advance
* Tips and Tricks
\
**Recommended Builds:**
1. **Praiser** - This build focuses on supporting party members by providing them healing and buffs from skills such as Blessing and Increase Agility.
2. **Exorciser** - This build focuses on Holy Light, which deals holy MDMG to single targets.
3. **Battle Priest** - This build focuses on ASPD and deals continuous PDMG. Acolyte's buffs provide them with increased stats and ASPD, letting them trigger card effects with normal attacks.
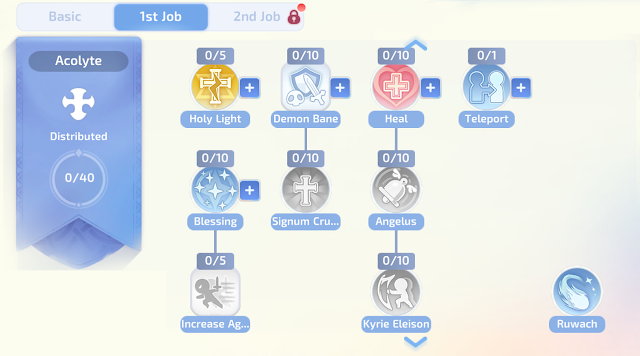
**Skill Points Distribution**
> For Exorcisers, it is advised to max out Holy Light, Blessing and Increase Agility first. Then spend the rest of the points on any skill that you need.
>
> For Battle Priest and Praiser, after maxing out Blessing and Increased Agility, you should spend the rest of the points on support or utility skills like Heal or Demon Bane.
> Exorciser deals Holy MDMG to single targets.
>
> Blessing increases STR and INT.
>
> Increase Agility increases ASPD and MSPD.
>
> Demon Bane and Signum Crucis increase damage done against and reduce damage taken from Undead monsters.
>
> Angelus and Kyrie Eleison increase survivability.Heal restores lost HP.
\
**Stats Distribution**
**Praiser** - Max out INT for increased healing, and then VIT for increased survivability. A dead support is no good for the party.
\
**Exorciser** - Spend points on both INT and DEX with a 2:1 ratio. This should increase both your MDMG output and casting speed.
\
**Battle Priest** - Max out STR to increase PATK. No need to raise AGI since we have a buff to increase agility already.
\
**Recommended Equipment**
**1. Praiser:**
Weapon: Dea Staff
Armor: Magic Coat or Eden Group Uniform
Garment: Hood or Eden Group Cloak
Shoes: Magic Boots or Vital Tree Shoes
Accessories: Clip
Cards: Most cards that increase healing are not released yet, so you may want cards that either increase INT, VIT, or DEX.
\
Note: You will need to stay alive to provide your party with healing and buffs. Your survivability and mobility are the key.
\
**2. Battle Priest:**
Weapon: Golden Hammer
Armor: Combat Uniform or Thief Clothes
Garment: Ancient Cloak or Morrigane's Cloak
Shoes: Bunny Slipper or Morrigane's Boots
Accessories: Silver Ring
Cards: Picky, Nine-Tails, Andre, (Racial, Element, Size) Cards. Also, you should be using cards that auto cast offensive skills.
\
Note: This build is the direct opposite of support Acolyte. It focuses on dealing PDMG instead of MDMG, thus your support capability is limited. However, this is a balance build to deal decent damage for both PvE and PvP.
\
**3. Exorciser:**
Weapon: Dea Staff
Armor: Magic Coat
Garment: Hood
Shoes: Magic Boots
Shield: Exorcism Bible
Accessories: Clip
Cards: Cards that increase MATK or INT. Baby Desert Wolf is a must.
\
Note: This is a build that deals Holy damage. It is very efficient against undead and shadow monsters. Holy Light also removes the buff from Kyrie Eleison, so this is also good in PvP.
\
**Acolyte Job Progression**
After graduating from the Novice Academy, you will take your journey to Prontera, the capital city of Rune Midgard Kingdom, to accept your Job quest from the Acolyte Guild.
Congratulations! You are now an Acolyte.
**Leveling Spots:**
If you decide to try the Exorciser build, you should go after undead and shadow monsters.If you choose to be a Battle Priest, you should look for medium and large sized monsters since you will be using a hammer.
1. **Prontera West Gate** - Base Lv.10 to 20. Grind Rockers and Thief Bugs.
2. **Desert Crossroad** - Base Lv.20 and above. Grind Baby Desert Wolf for the card.
3. **Payon Cave** - Base Lv.20 and above. Target Zombie and Skeleton.
4. **Byalan Island** - Base Lv.40 and above. Grind Vadon and Hydra for their cards.
**Job Advance:**
Upon reaching Job Lv.40, Acolytes can advance their job into either Priest or Monk.
Since Monk is not yet released, let's only focus on the Priest.
Priests are divided into 3 builds: Praiser, Battle Priest, and Exorcist.
Weapon: Dea Staff
Armor: Magic Coat or Eden Group Uniform
Garment: Hood or Eden Group Cloak
Shoes: Magic Boots or Vital Tree Shoes
Accessories: Clip
Cards: Most cards that increase healing are not released yet, so you may want cards that either increase INT, VIT, or DEX.
\
Note: You will need to stay alive to provide your party with healing and buffs. Your survivability and mobility are the key.
Weapon: Holy Stick
Armor: Magic Coat
Garment: Hood
Shoes: Magic Boots
Shield: Exorcism Bible
Accessories: Clip
Cards: Cards that increase MATK or INT. Baby Desert Wolf is a must.
\
Note: You can go with the massive AoE skill - Magnus Exorcismus.
Or the single target skill - Turn Undead, which can instantly kill undead monsters.
Weapon: Golden Hammer or Judgment of the Holy Hammer
Armor: Combat Uniform or Thief Clothes
Garment: Ancient Cloak or Morrigane's Cloak
Shoes: Bunny Slipper or Morrigane's Boots
Accessories: Silver Ring
Cards: Picky, Nine-Tails, Andre, (Racial, Element, Size) Cards. Also, you should be using cards that auto cast offensive skills.
\
Note: This build is the direct opposite of support Acolyte. It focuses on dealing PDMG instead of MDMG, thus your support capability is limited. However, this is a balance build to deal decent damage for both PvE and PvP.
\
**Leveling Spots:**
Base Lv.40 to 50: Grind Pirate Skeletons and Megalodons in Shipwreck Labyrinth.
[](https://blogger.googleusercontent.com/img/b/R29vZ2xl/AVvXsEiEn7OnL2rWJeQRhxiVzSwGqlzQcNW854XyhKTLmTyz_n4mVEz7ugCkEjrwODX50qbsNg1QSXRA-Y6TCmuODZlHoEXgZPAvpn3qyhnYfW4s9BEmtPwIr98-X2aGEtu0Ka_tkPBI5ea5Kr_JZmmPetP6se4KJStgDirq63YUGn2KyZEKbpYKou-n6qVl/s774/Ragnarok%20Origin%20Global%2002_05_2023%2018_45_36.png)[](https://blogger.googleusercontent.com/img/b/R29vZ2xl/AVvXsEh1iovSwWilZ-IN_9IjZvrOMgXFMmvU-JDilVk_spRoDWah_pwr5hMI_moh2fGUO_u7XQTI77QLsHr5ICqGrIDWBCBUILCBZgHLGDtcw_mfG40S94dcRp7L-lZR-MwEjVW0rvUhAP2A5pvRVBnz-UHwfBZ0UqvNtNGn7yf7Jtatspj_ztlpX-oQGO09/s588/Ragnarok%20Origin%20Global%2002_05_2023%2018_45_41.png)
Base Lv.40 to 50: Grind Soldier Skeletons, Mummies, and Archer Skeletons in Pyramid 1F.[](https://blogger.googleusercontent.com/img/b/R29vZ2xl/AVvXsEgv5RuTW37wpOlBE-DSIKR9LyPmDeOKs88rdi3TIpDdDHOJV40uz_jZdIWGUHOH7-1V-OX5tWGplu9eR4FtCC5QO8DQGSoOVEJGg4XSS402PHqZDyBuUJxaLENSLTULYiML_AYpssKEQyVaRqf_nTfBvS5n4K78BpFkdjttIiO0uUfaplNVE1eN6FaV/s773/Ragnarok%20Origin%20Global%2002_05_2023%2018_47_20.png)[](https://blogger.googleusercontent.com/img/b/R29vZ2xl/AVvXsEi4-iROEvZgFZjUYTZIx8R_8aBnhNZ7_x3_npz41EYPhbvck4CeZ9gzlVhuzA5c40GX7bQvYPFW4gO2irpniHXwYTQzKCvUKk-eX6skc5gOlnDcLSvfh2bmiERNZxz5N-xm5SoUVThjCmtH8aUrDUdAA4AuXt7GSFHFs0lI5USveDRaMjZNQrcEGaed/s477/Ragnarok%20Origin%20Global%2002_05_2023%2018_47_24.png)\
Base Lv.50 to 60: Grind Archer Skeletons, Bonguns, and Munaks in Payon Cave 2F.[](https://blogger.googleusercontent.com/img/b/R29vZ2xl/AVvXsEgO03BAZ2hXHasGYRkibOmliN8R7jjIW3DEgSsUDQeWjPJf_f2hlNHOgx8PqDtPSUGyfRKcL4yk5AHSyNGk-xFXP3VhPzw1PE6-ElhlxJ_SQfeNRHsyTBLIHz_HsEPVjJp6xfQ7NMxLw9FWFQf7Afcz-OXyQL7ud6HxL9ckyWjbGBkesSYVPQ1ub1Pw/s782/Ragnarok%20Origin%20Global%2002_05_2023%2018_50_03.png)[](https://blogger.googleusercontent.com/img/b/R29vZ2xl/AVvXsEjOIVC5afEoZpsuEuErOXVup-CVHYcFyo3RcijrheFxjD8k2-ZOSnBX9U7aViZyn5iRGs16XgFaZ3mT3oaEpYpvugF0vrqdR-W9e8TCPOQ-gSiejucbEMYAALn_1GfvryOB10cuy0Zbaw7EK9UHWczCa5oIBJ2fok_p2gTmQDp8Xj0jGcncVPQ3eB2H/s584/Ragnarok%20Origin%20Global%2002_05_2023%2018_50_07.png)
Base Lv.50 to 60: Archer Skeletons, Mummies, and Verits in Pyramid 2F.[](https://blogger.googleusercontent.com/img/b/R29vZ2xl/AVvXsEgjxr7Gju26vqdEFyeVSY8-iB0ddBjx1ySMwTqpd9WFfSscEzg02uLKWAGiqjJGNq82ZhENGcojJEPeuR8iQRbSqkjs2V3q4x4u9FjYtOWFFX50aiUJNquy4bW4dVCd0JyQF_5DNlZEpEB9dH8Cw7sIK1t9Syh0yBMwdRnDr4fc6G4AaLe8M2SZvzY-/s779/Ragnarok%20Origin%20Global%2002_05_2023%2018_48_09.png)[](https://blogger.googleusercontent.com/img/b/R29vZ2xl/AVvXsEhpvLtVISjshhgFiINWnwy-MWR2Z_YiUnnqWzvo4Wrbec52bODiqBHXBZUnD0ARv2XO78q7yWaSmHNcWmhqaFJaANCj3bl1IcCsEazIcMHWdMNyPNMxd86alKrNvAFtVxbQwW9tPseuom8oE0eTqS0-QD2viDYhDPoDBeHpmNmLwUmEgpDTmtNR_9CX/s587/Ragnarok%20Origin%20Global%2002_05_2023%2018_48_13.png)
Or you can spend your time targeting the Skeleton workers in Mjolnir Abandoned Mine.[](https://blogger.googleusercontent.com/img/b/R29vZ2xl/AVvXsEhAR7F_pd87zP0yKQQWTfOXeQQDJrSCXZ5EWxIoTN4JBW-dH_YDbh35llfG49CGaMAyxgQ32f_SiV8C_EKDXpECT_OcRsm7mu0pKdQqcKfNARFOdyniQwm_mnwAMm3BtlkeTkb9AsOQ6hcr4TzYTOMKSql8h7ZHZCOMfWlBXNK0kE7wH9jaEWGQJs5Z/s782/Ragnarok%20Origin%20Global%2002_05_2023%2018_35_15.png)[](https://blogger.googleusercontent.com/img/b/R29vZ2xl/AVvXsEhlnLAyUO0BXalQyfGlnlEMFyFl8qWe68hkl89Fue7nZPICS1lD23xvEGSHKu15lTG-rnjTBSSzSMEa-Qn7-lnwnQM3qJE_bGDMi4NV6Lgpkg_ODcs49ZBrqFtX8hRcdHKGBhq4goQ1GS2aRhsSN3T0m6_u_TKpdi-sfYIjxHPC719UCoVge9ww8mpc/s586/Ragnarok%20Origin%20Global%2002_05_2023%2019_57_06.png)
**Tips and Tricks:**
* For Battle Priest, using Concentration increases your ASPD.
* This job will progress very slowly at the beginning, where you will need to rely on all of your self-buffs.
* After becoming a Priest, always bring Blue Gemstones with you.
* Always adjust your positioning to increase yourself alive. And always remember that a dead support is no support.
* For grinding, target monsters that are weak to Holy damage (Undead, Shadow, Poison).
---
# Agent Instructions: Querying This Documentation
If you need additional information that is not directly available in this page, you can query the documentation dynamically by asking a question.
Perform an HTTP GET request on the current page URL with the `ask` query parameter:
```
GET https://roo-global.gitbook.io/guide/job-guide/acolyte/acolyte-lv1-70.md?ask=
```
The question should be specific, self-contained, and written in natural language.
The response will contain a direct answer to the question and relevant excerpts and sources from the documentation.
Use this mechanism when the answer is not explicitly present in the current page, you need clarification or additional context, or you want to retrieve related documentation sections.